Upcycled Aluminum Can Craft – DIY Hosta Plant
It’s not as if I murder every plant I touch. Let’s just say, if you needed some information from one of your tight-lipped Rose Bushes or thought your Geraniums were skimming off the top, you could probably drop my name to get them to talk.
I don’t keep house plants except for a few sprigs of greenery that have been “propagating” in water for months, foolishly hoping they will wriggle their little root toes in dirt someday. But unfortunately, the odds are not in their favor. In this house, plants either survive on air or completely submerged in water. I mean, I have a reputation to maintain, after all.
In one hilariously bad decision early this summer, I decided to start a vegetable garden because I am just that malicious.
We made special raised garden beds, bought dirt and mulch, and lots of little leafy victims. But somewhere, under all of my good intentions, I just started channeling my inner executioner.
Anyway, that was just a long-winded way of saying that I can’t get anything to grow in this planter, so I decided to improvise.

Never miss a post – sign up to receive email notifications from the Lab

Step 1 – Cut and Flatten Aluminum Cans

This quick video will show you how I flatten my aluminum cans for crafting.
Step 2 – Cut Leaf Shapes

I started by cutting out some paper templates with leaves in several different sizes.

This is the plant model I am trying to copy.

You will note that it would rather grow wild in the scorching hot gravel living off water scraps from the other planters than have me care for it in my little tin torture chamber. But I digress.
For my design, I planned to use around 15 strands of leaves. And this plant sprouts the leaves in pairs. So I used about 15 cans to cut all the different leaf sizes.
Step 3 – Emboss Leaf Shapes
I used my embossing tool to “draw” a line down the center to give the leaves a more three-dimensional look. This folded the leaves a little and made the next step easier.

Step 4 – Glue Leaves Into Pairs

I used some dollar tree wire cut into short 3 to 6-inch pieces to make the leaf pairs. Then I used E6000 glue to attach matching-sized leaves to each end of the wire, leaving about 1 to 2 inches of wire between the leaves. E6000 glue takes 24 hours to cure, so you will want to allow several hours before moving to the next step.


Step 5 – Attach Leaves

To make the vines, I cut different lengths of 20 gauge copper wire and then twisted the leaf pairs onto the copper wire. I started with the smallest leaves at the bottom and added larger leaves as I worked up the wire. I left about 8 inches at the top of the wire to “plant” in the ground. To keep the pairs of leaves from slipping, I made small kinks in the 20 gauge wire to hold the leaves in place.


Step 6 – Paint and Seal
I coated each side with a coat of Rustoleum bright copper spray paint.

Then I used a couple of green and blue acrylic paints to make the faux oxidized look. One of the easiest ways to apply the paint is with a paper towel.

This video has more information on how to apply the faux oxidized copper finish.
Once the paint is dry, you will want to seal it since acrylic paints are not intended to hold up to the elements. I have used this Decoart DuraClear gloss varnish for many of my projects this summer. It is water-based, easy to brush, and dries shiny and transparent. And the label says it is suitable for interior and exterior use.

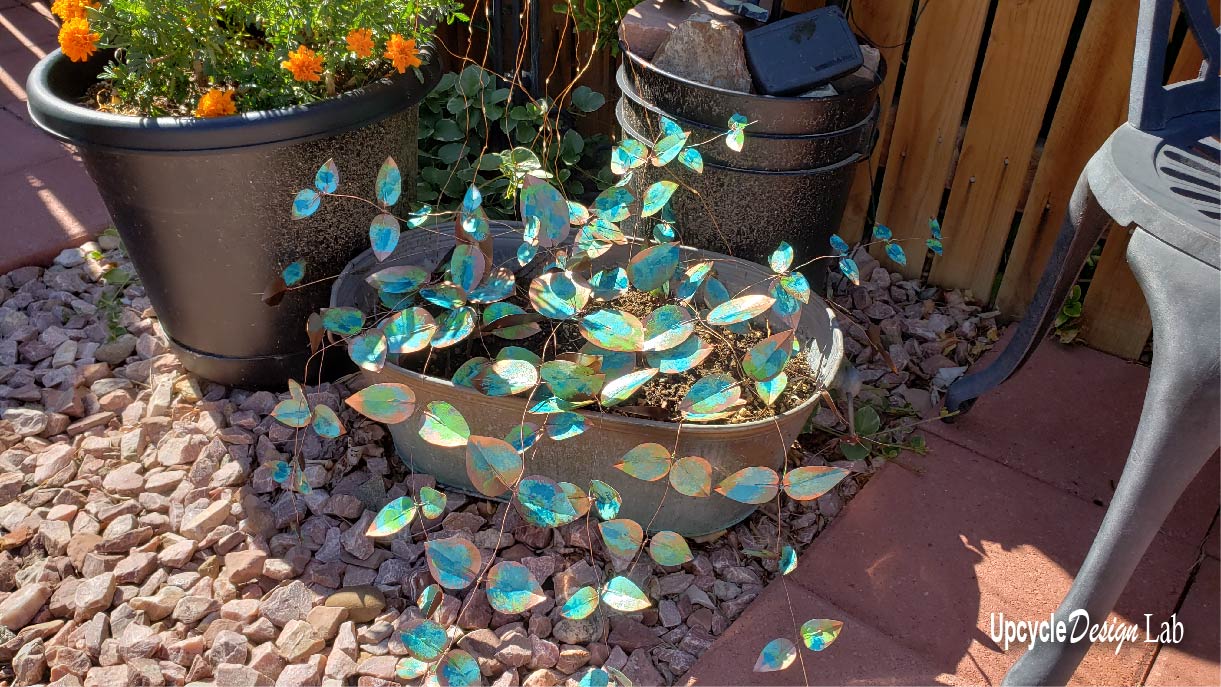
Step 7 – Plant
The last step is to “plant” them. I made vines in several different lengths to add variety to my display.

If you wonder why I painted them with a faux oxidized copper finish, I can only assume you haven’t seen these projects. 🙂
You could paint them to look more realistic if you wanted.

Happy Upcycling,
Cindy

PS. It probably won’t surprise you to learn that I don’t really know what hostas are. 🙂
If you enjoyed this project, check out these other aluminum can plant creations.
Advertising Disclosure: Upcycle Design Lab may be compensated in exchange for featured placement of certain sponsored products and services or your clicking on links posted on this website.


waa muy muy lindo junte muchas lats pero es la primera vez que veo tus videos me encntan y oy a seguir te gracias
Thanks so much for checking out my project. 🙂