DIY Aluminum Can Pumpkins – Upcycled Thanksgiving Decor
I have this theory that Thanksgiving must suffer from middle-child syndrome. I mean, take a glance at any party store or big box retailer’s seasonal section this time of year, and what do you see? A typical scene is a well-picked-over Halloween display all orange and black and jack-o-lanterny and across the aisle is the blossoming mushroom cloud of red and green signaling the upcoming Christmas extravaganza that is still months away!
I mean, talk about the spoiled baby of the family! Geez!
If you look really hard and dig into the pile of picked-over Halloween costumes and disheveled decorations, you might discover a package of turkey napkins with a set of matching plates. They are, of course, already marked down to make more room for the spoiled baby of the holiday season.
And don’t even get me started on the candy aisle! Thanksgivings Goth older sibling gets Candy Corn, and its younger rosy cheeked relation not only gets candy canes but also special foil-wrapped chocolates and treat-filled calendars. And, of course, they both have quite an array of cookie-cutter shapes to further bolster their self-esteem.
And what does Thanksgiving get? One hastily thrown-together meal possibly served on discounted turkey plates with matching napkins. There is a pumpkin or pecan pie, but those could just as easily show up for the babys celebration later in the year. This leaves nothing noteworthy for the poor middle child of the holiday season to call its own except maybe a pumpkin. But that is only if there is one left without some garish face carved into it.
The Halloween decorations come down, and the Christmas decorations go up! And poor Thanksgiving is just a small blip in between awkwardly wearing hand-me-downs and searching for a childhood picture of herself that doesn’t have her sisters in it. Ok, so a little bit of this might have been about me, but we middle dwellers have to stick together.
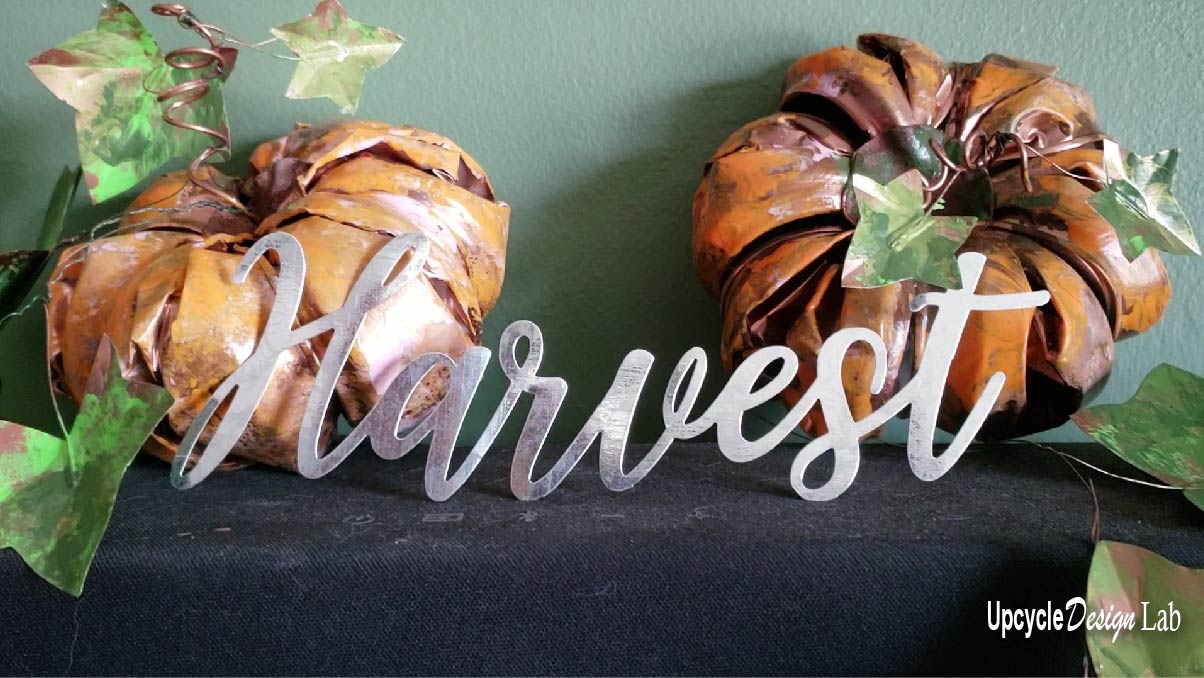
So Thanksgiving I made you your very own pumpkin.
I know you might be thinking, “What about New Year’s Eve? Doesn’t that make Christmas a middle child too?” And the answer is don’t be silly everybody knows New Year’s Eve is the cool older cousin.
Step 1 – Collect Cans
To make each pumpkin, I used several aluminum cans, so the 1st step is to collect 8 to 10 aluminum cans. You will need 6 full cans for each pumpkin and flattened aluminum sheets to make the leaves.

I removed all the pull tabs From my cans and saved them for another project.

Once the cans are rinsed out and cleaned, set aside 6 full cans and then cut apart the remaining cans and flatten the walls of the can.If you need more information on how to flatten cans check out the video below.
Step 2 – Crushing Cans

To make the pumpkin, I started with the full cans and carefully crushed them to about half their size with my hands.
Next, I put the cans in a vice to crush one side of the can. You want to end up with 6 pie-shaped pieces.

Step 3 – Assemble Cans

To assemble the pumpkin shape, I used hot glue to attach the cans together.

This step is a little tricky as it’s hard to hold the pieces while you are gluing, and you may need to reshape the cans a little bit in the vice to get them to fit together.

Don’t worry if the pieces aren’t that secure at this point.

Step 4 – Making the Stem

To shape the stem, I used heavy gauge copper wire wrapped around a screwdriver driver to make a coil.
Step 5 – Stabilizing the Pumpkin Shape

To stabilize the pieces, I used 2 small circles of scrap fabric about 2″ in diameter. I applied scotch clear mounting tape to adhere the fabric scraps to the cans and also secure the cans together better.
One circle of fabric is attached to the center of the bottom of the pumpkin, and the 2nd circle is attached to the top with a slit in the circle for the stem.

Step 6 – Cutting The Leaves
You can make as many leaves as you choose. There is a template for you to use at the bottom of this post, or you can sketch out your own.

Once I had several sheets of flattened aluminum, I attached my templates with removable painter’s tape and used a regular pair of scissors to cut out the shapes.
Step 7 – Embossing the Leaves

To make the pieces look more leaf like I used my embossing tool to add some dimension.

To finish shaping the leaves, I added a short piece of florist wire using E 6000 glue.
Step 8 – Adding Color
You can add color any way you like. My favorite way is a simple technique using acrylic paint, paper towel, and spray paint.

For this project, I started with a coat of Rustoleum bright copper spray paint on all of the aluminum pieces.
For the additional pumpkin colors, I used Anita’s Baby Pink, DecoArt Americana Bright Orange, and DecoArt Americana Espresso.

For the leaves, I used DecoArt Americana Sour Apple, DecoArt Metallic Festive Green, and DecoArt Americana Avocado.
Check out this video to learn more about this simple painting technique.
Step 9 – Sealing

To finish and seal the acrylic paint and to add a little bit of shine, I brushed on a coat of DecoArt DuraClear Gloss Varnish.
Step 10 – Assemble / Display

The final step is to assemble and display the pumpkins. You can wrap the wires of the leaves together into a long vine, tuck them under the pumpkins attach them to the pumpkin stems.

I experimented and played around with the layout until I had the display the way I liked it.

Happy Upcycling,
Cindy
Advertising Disclosure: Upcycle Design Lab may be compensated in exchange for featured placement of certain sponsored products and services or your clicking on links posted on this website.


That’s a cool idea. I enjoy your projects. 👏👏👏❤️
Thanks so much Nina!