How to Cut Aluminum Soda and Beer Can in a Cricut Cutting Machine
Hello out there. Welcome to the lab.
Do you have a Cricut or other cutting machine? I got one several months ago. Unfortunately, I haven’t used it enough to justify the price tag. Still, it is a fun toy to have in my crafting toolbox.
I still have a lot to learn about it, but I have used it for a few projects. I cut some freezer paper tee shirts prints that were fun to make, and most of them turned out pretty well. I have also used it for some paper projects, including cutting out simple star shapes price signs for my first craft show.
But one of the main reasons I bought the machine was to see what recycled materials I could cut with the Cricut Maker. It has taken me a while to get up the nerve to cut “unauthorized” materials, but I am not the first one to try it. Other braver souls have led the way, and so they have given me the courage to proceed.
If you have been with me for a while, you may remember last summer. I went through an upcycled tin can phase. I enjoyed experimenting and creating lots of projects from this one medium.
Currently, I am revisiting crafting with aluminum cans. Last spring, I made several simple aluminum can projects, and I finished my embossed aluminum can art journal cover in my previous post. You can find part one of this project here and part two here.
So it only seems fitting that I should try cutting aluminum cans with my Cricut cutting machine.
The good news is that it worked well, and you only need a regular fine point blade. As a side note, all the different Cricut cutting blades have been one of the most confusing things for me.
Anyway, as I mentioned, I am not the first person to try this, and I can’t say for sure whether or not it is hard on the machine, so proceed at your own risk. However, I can say that the Cricut Maker is designed to cut all kinds of materials, including thin copper sheets, so cutting a similar material seems reasonably safe. And the cuts I have made so far have turned out well.
Advertising Disclosure: Upcycle Design Lab may be compensated in exchange for featured placement of certain sponsored products and services or your clicking on links posted on this website.
So let’s begin if you dare. 🙂 You can get all the details in the video tutorial or check out the step-by-step overview below.
Step 1 – Cut and Flatten Cans

The first thing you need to do is clean-cut and flatten an aluminum can. If you need tips on how to do that, I have a 2-minute tutorial video you can check out.
Step 2 – Select/Design Art

If you are new to Cricut, their Design Space software can be a little overwhelming. Just make sure that the size of your design will fit on the sheet of aluminum. So you are limited a little bit by the smaller size of the material.
I made this simple design in Adobe Illustrator. I designed it with cut lines and engraving lines because I wanted to try both techniques. If you don’t have an engraving tool, you can use your fine tip blade for the cutting step.
Step 3 – Prep Material for Cutting

I have been using my medium grip mat for cutting the aluminum can sheets. The other thing you need to do is tape down all the edges. A skinny piece of painter’s tape works well for this.
Step 4 – Machine Settings

I have been using the 40 gauge thin copper setting to cut my aluminum can sheets, which seems to work quite well. You can also set up custom materials for your machines. I have only done this once, so if you are interested in making your own settings, you can also look into that.
Step 5 – Cutting and Engraving

The cutting process goes very smoothly. I have been pushing the star wheels to the end of the rod off of the aluminum when cutting. But to be honest, I don’t know if it makes a difference. As I mentioned, I did engraving and cutting on my design, and both tools worked well on the aluminum can.
Step 6 – Remove Material from Matt

The trick here is to curl the matt away from the aluminum so that the aluminum remains flat and does not curl back up.
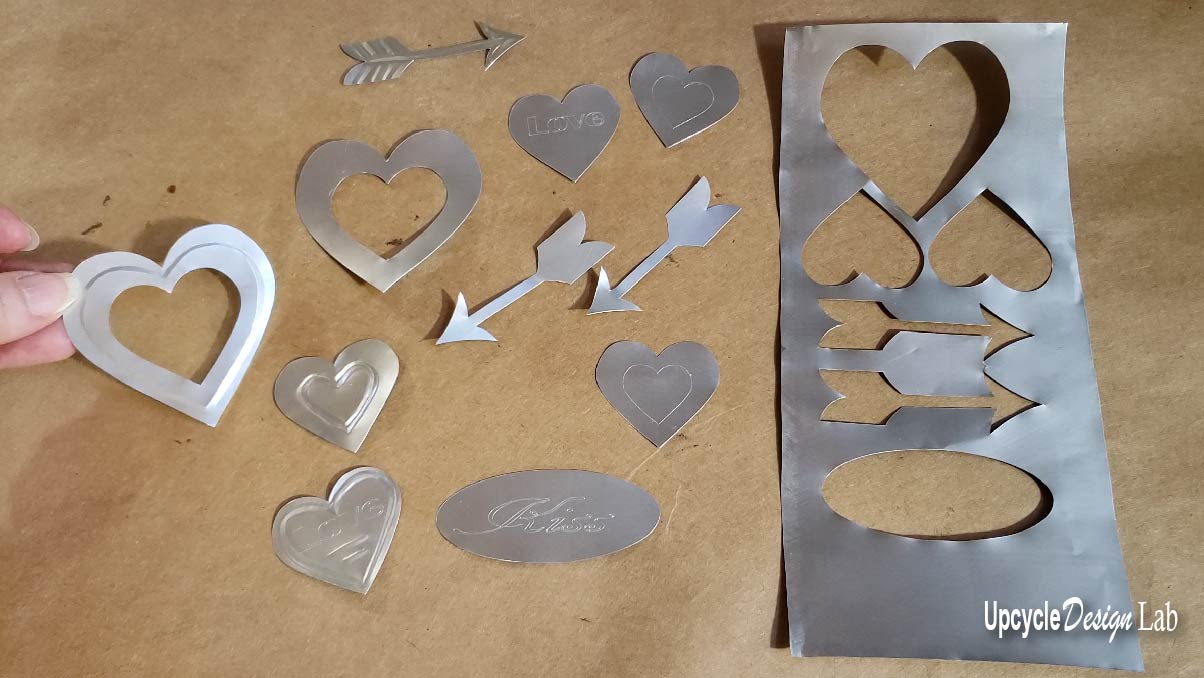
Step 7 – Weeding

I gently fold a small area until it is separated, then I carefully pull the pieces apart along the cut line. The weeding tool can be helpful with this process. There is more detail in the video tutorial on weeding aluminum if you are interested.

These pieces can be used for scrapbooking, art journals, card making, and more. They are ready to be embossed or to have some color added with some alcohol ink. If you are interested in more information on embossing or alcohol ink on aluminum can sheets, be sure to check out part one of my art journal project.
Thanks for dropping by. Have a lovely day.
Happy Upcycling,
Cindy
Advertising Disclosure: Upcycle Design Lab may be compensated in exchange for featured placement of certain sponsored products and services or your clicking on links posted on this website.


Hi! Interesting post! Have you been doing more aluminum sheet cutting in the meantime? I plan to buy a Maker 4 for that exact reason but it’s expensive and I want it to last a while. How many iterations does the machine need till the sheet is cut?
Thx for any reply!
Best,
Patrick
Hi Patrick,
Yes I have cut the aluminum for other projects mostly for bead making and for making flowers from the cans. You can find the tutorials on my blog or YouTube channel. Thanks for checking out my project.