How to make Beads from Beer and Soda Cans – 3 styles – Upcycling Aluminum Cans
Hello Friend,
Greetings from the Lab. I hope you are cheerful and well. I am beginning to shed my heavy coat of winter blues even though we are expecting four to eight inches of snow today. I can feel the days starting to stretch themselves a little each day as they promise the coming of Spring. It feels good to enjoy a few more minutes of sunshine at the beginning and end of each day.
So what have you been up to? Are you itching for Spring too? Do you have plans for your garden and yard? Are you still housebound in some cold climate? Are you making and creating something that brings you happiness?
Here is something I have learned from my many trips around the sun on this planet. When I keep my hands busy, it calms the noise in my head. Do you agree? This is one of the reasons that I enjoy crafting so much.
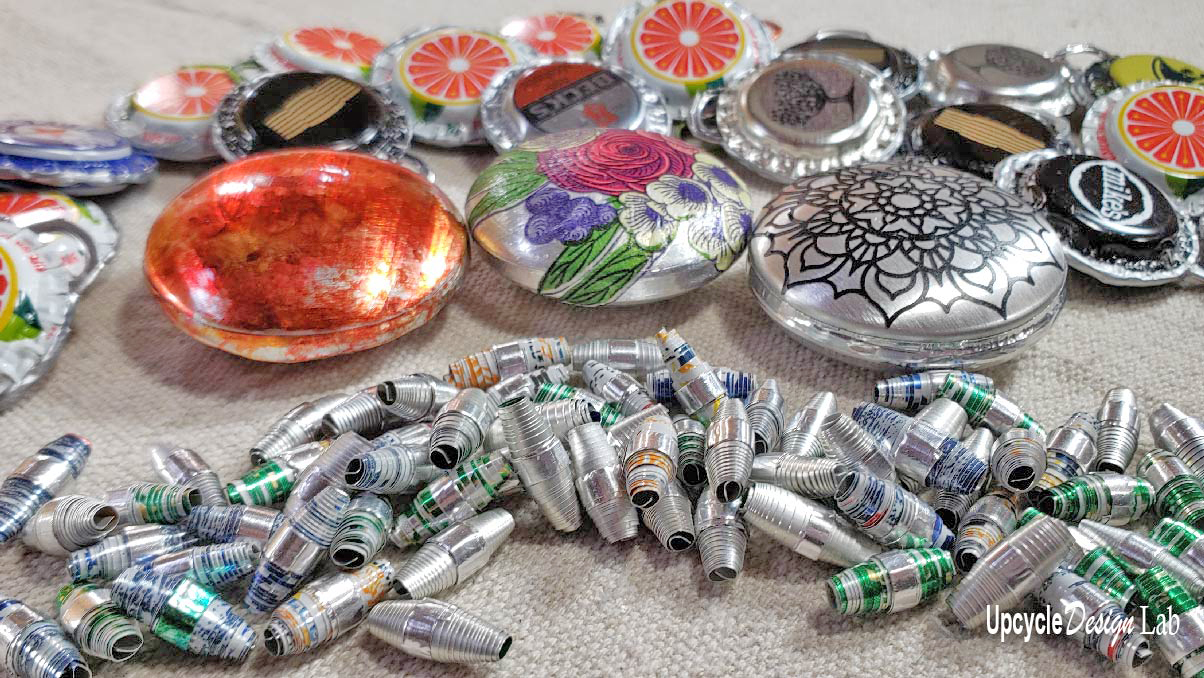
Today I have three different techniques and styles of beads that you can make using aluminum cans. If you would like to see these beads made into jewelry and other accessories, be sure to check out my next post.
Advertising Disclosure: Upcycle Design Lab may be compensated in exchange for featured placement of certain sponsored products and services or your clicking on links posted on this website.
Bead Style One – Bottle Cap Beads
Materials
- Hot Glue
- E6000 Glue
- Silver Dimensional Paint
- Needle Nose Pliers
- Clothespins
- Two Bottle Caps
- One Soda Pull Tab
Step 1 – Flattening the Edge of the Bottle Caps
The first step is to use some needle nose pliers to flatten the edges of both bottle caps.

Steps 2 – Attach Pull Tab
Next, you can use hot glue to attach the pull tab to one bottle cap.


Step 3 – Assembling Pieces
I like to use E6000 or Gorilla Clear Glue to glue the two bottle caps. A clothespin is handy for holding the bottle caps in place while the glue dries.


Step 4 – Finishing Edges
To finish the bead, I used some silver dimensional paint on the edges of the bottle caps. It is easy to apply the paint with the bottle’s pointed tip, and the paint fills in any gap between the two bottle caps.


If you pay attention, there are some fun bottle caps out there to collect. These beads can be made into jewelry, wine glass charms, key chains, zipper pulls, and more.

Advertising Disclosure: Upcycle Design Lab may be compensated in exchange for featured placement of certain sponsored products and services or your clicking on links posted on this website.
Bead Style Two – Large Pendant Bead
Materials
- Hot Glue
- E6000 Glue
- HVAC Metal Tape
- Putty Knife
- Joint Compound
- Small Scissor Tin Snips
- Small Eyelet Screw
- Small Self Healing Cutting Matt
- Rotary Cutter
- Clear Grid Ruler
- Alcohol Ink (optional)
- Bottom of Two Aluminum Cans
Step 1 – Prep Aluminum Can
To make these large pendant beads, you will start by removing the bottoms of two aluminum cans. Next, use the tin snips to trim down the edges, leaving only the dome portion of the can. You may want to wear gloves for this step as the edges are quite sharp and rough.

Step 2 – Fill
If you have done any home projects, you probably have some type of filler left over. I used a joint compound for this step. But other products would also work. You need something that will dry smooth and hard. Any drywall mud would work; spackling, grout, and wood filler are other options.
I used a putty knife to fill the aluminum pieces with joint compound and let them dry overnight. Depending on the product you choose, your dry time may vary.

Step 3 – Add Eyelet
Once the filler has dried, it is time to attach the eyelet screw. I used some clear Gorilla glue to attach the eyelet screw to one side of the pendant bead. This glue takes 24 hours to cure completely. But it should be set up in a couple of hours so you can move to the next step.

Step 4 – Assemble
To assemble the two halves, I used a combination of Gorilla glue and hot glue. I often use these two types of glue together because I am impatient, and I like the quick grab of the hot glue but want the durability and strength of the Gorilla or E6000 glue.


Step 5 – Finish
To finish the bead, I used a thin piece of HVAC metal tape to cover the gap between the two parts. If you have a rotary cutter and cutting mat, this is the fastest way to cut a 1/8-inch strip of tape.

Start at the eyelet screw and work all the way around the bead. Then use your fingernail or a burnishing tool to smooth the tape.


The pendant bead is now ready to decorate. I used alcohol ink, Cricut vinyl, and decoupage to decorate the beads I made, but you can probably think of many more ways to decorate these fun beads.

Bead Style Three – Rolled Aluminum Beads
I must confess that I am really excited about these beads. However, I wasn’t sure if this technique would work. The video below will give you detailed instructions on how I roll beads made from aluminum cans.
I have made rolled paper beads before without a bead-rolling tool. Since the paper is so limp, it is easy to roll it around a wooden dowel or skewer. But this technique does not work for aluminum since it wants to uncoil with much more force than paper.
To use this technique, you will need a bead roller. I found this one on Amazon for less than $15.00. It works great with aluminum pieces.

materials
- Bead Rolling Tool
- HVAC Metal Tape
- Scissors
- Cricut Cutting Machine (optional)
- Standard Grip Matt (optional)
- Fine Point Blade (optional)
- Paper Bead Template
- Flatten Aluminum Can Sheets
Step 1 – Cut and Flatten Cans
The first step is to cut the aluminum cans to make the aluminum sheets. This quick video tutorial lets you learn how I cut and flatten my cans.
I used my Cricut maker to cut the aluminum. You can download the file below if you have a cutting machine and would like to use my .svg file. You can also find more information on cutting aluminum with a Cricut cutting machine here.

If you don’t have a cutting machine, you can use scissors and a paper pattern to cut the aluminum. Below is a .pdf version that will fit the aluminum can sheet if you want to use it.

And, of course, there are other bead styles that you can try as well.
Step 2 – Prep Cut Pieces
To prepare the aluminum pieces for the bead roller, you need to curl the ends in a tight coil. This will ensure that the bead roller will grip and coil the material into a bead.
I used a small skewer to start the coil and then tightened it with my fingers. If you need more details, you can find more information in the video tutorial.


Next, I cut a small piece of the HVAC tape. The measurements for the tape are approximately 1/8 of an inch by 1 inch. This tape has a paper backing. To attach it to the aluminum, you should peel back a small portion of the paper backing but leave the paper on the tape and apply it to the tip portion of the aluminum piece.
The aluminum can be rolled in either direction; just be sure the tape is on the outside edge of the bead and matches the direction of the coil you started by hand.

Step 3 – Roll and Secure
The bead roller that I used was very simple. All I needed to do was slide my coil onto the metal bars and turn the handle to roll the bead.

Once you reach the end of the piece, carefully remove the tape backing and coil the tape around the bead to secure it.

Once the end is secure, you can remove the bead from the bead roller and repeat the process to make your next bead.

It is a little addicting, so I made quite a few.
Thanks so much for spending a little time with me today.
Happy Upcycling,
Cindy


