How to make Decorative Notebook Covers From Aluminum Cans
I recently had the hilarious experience of getting reacquainted with my 14-year-old self. It was a tiny glimpse into a short window of time. And it revealed a mildly boy-crazy girl suffering from all the melancholy, broody, moody trappings of being 14.
How did I run into this younger self, you may be wondering. Well, she kept her first diary for a few short weeks in the summer of 1978. Yikes! That was a long time ago!
The entries are rambling, sometimes mopey recitations of events almost exclusively about boys who either thrilled or disappointed the adolescent me. This now-foreign individual used words like “neat-o” and “poopy” to describe her deepest emotions, and she makes me chuckle. She named her diary Bert after a tree that she had also named Bert, and none of that seemed at all strange to her, even though it seems entirely inexplicable to me.
I feel certain that this fragile little creature would be mortified if she knew how hard she made me laugh but come on, Bert? I mean, really, it’s laugh so hard you snort worthy. And why am I writing letters to a tree? I mean, I wasn’t forlorn or friendless. Anyway, I am quite certain that I had no idea how entertaining I was going to find myself in the future.
Today I can’t even remember the events that prompted these early journal entries, so perhaps it is strange that I do remember why I decided to start writing this first journal. It was because of the book itself. I don’t know how I stumbled upon it, but I loved it immediately. The cover was uninteresting and slightly warn but bound between its hard outer shell were soft, intriguing, midnight black pages. This was well before the advent of all the rainbow-colored gel pens, and I savored the writing experience as I dipped my fountain pen into the milky white ink to put my capricious thoughts to paper.

Today, the 14-year-old me is a murky stranger, but I still share her love for interesting and pretty books with empty pages just waiting for the scratch of a pen or the stroke of a brush to bring them alive.
Over my lifetime, I have been a journaler, a scrapbooker, and an ardent list maker, and I have even tried my hand at art journaling. This has led to many books, and while some are plain, I still prefer the ones with pretty covers. But I can’t say I like to pay a lot of money for them. Fortunately, I like making things.
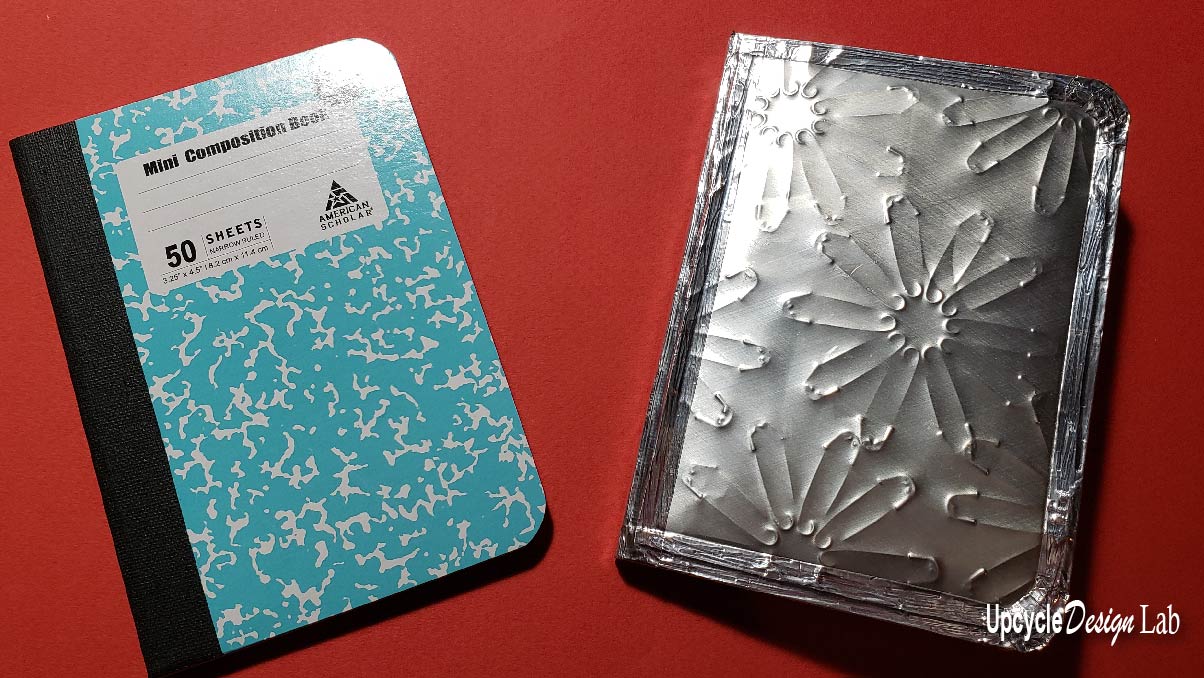
In today’s tutorial, learn how to make an inexpensive dollar tree notebook look high-end using upcycled aluminum cans.
Step 1 – Clean and Flatten Cans

To make these small notebook covers, you will need the flattened sides of two empty cans. Check out this short video to see how I cut and flatten my cans for crafting.
Step 2 – Add Texture or Pattern

The next step is to add a texture, pattern, or decorative design to your aluminum sheets. If you enjoy embossing, this is one fun way to add a design. If you are looking for a faster way to make patterns and textures on aluminum sheets, watch this video for inspiration.
Step 3 – Make Outside Cover
To make the outside cover, I used a piece of cardstock. First, I traced around my notebook to make a template. Then I cut the template slightly smaller than the actual notebook.

With my template taped to my aluminum sheet, I used scissors to cut the front and back covers.
Next, I used my embossing tool and a ruler to draw a line 1/8 of an inch from the edge around the shape.

To attach the cover to the notebook, I used a few pieces of mounting tape.

Step 4 – Tape Edges
To finish the edges and the binding, I applied some metal tape. It is easy to cut to the desired width and length by marking the paper backing. I used strips that were 5/8 of an inch wide. I lined the tape edge with my embossed line and wrapped the excess tape around the front and back covers.

Because the corners of my notebook were curved, I covered them first with a short piece of tape that I cut slits in and then added tape to each side.

Finally, I used my embossing tool to burnish the tape, which blends the edges and gives the appearance of one continuous edge.

The last step is to cut a piece of metal tape to cover the binding.
Step 5 – Make Inside Cover
To finish the inside of the notebook, I used my template to cut two more pieces of cardstock and a small amount of aluminum foil.

I used spray adhesive to apply the foil to the cardstock and a glue stick to attach the inside covers to the notebook.


Step 6 – Experiment
This project makes a great gift or stocking stuffer, so have some fun making a few more. You can spray the aluminum for different metallic colors.

Or design larger covers by pieces together different colors and textures.

Or grab your alcohol inks to add even more color.

Happy Upcycling,
Cindy

Advertising Disclosure: Upcycle Design Lab may be compensated in exchange for featured placement of certain sponsored products and services or your clicking on links posted on this website.


