Junk Mail Christmas Trees
Hello There and Welcome to the Lab,
Are you ready for Christmas? Has your home been decorated since Thanksgiving with delightful seasonal cheer and elfish charm? Is it magazine spread, Martha Stewart and party-ready? Are your gifts all wrapped with the most stylish of wrappings?
Did you answer yes to any of these questions? Then I have one more. What in heavens name are you doing here? And by here, I mean on my blog reading about Christmas decorations made from trash.
Not that you aren’t welcome because, of course, I love that you are here. I am honored to have you, and I really hope that some of your preparedness, interior design sense, and general holiday cheer will rub off on me.
So twinkle your nose (that is a Bewitched reference for those of you under the age of 50), cross your arms, and nod your head (I Dream of Jeanne, sorry another reference for us old folks), or sprinkle me with your pixie dust (Peter Pan is old but pretty timeless so hopefully you youngins caught that one) and bequeath some of your talents and gifts upon me I need a little help this year.
Grammarly wants me to know that “A knowledgeable audience might find this (above) sentence hard to read,” And they would like me to remove any unnecessary words. But I happen to know that if you are reading this, you are so much more than just knowledgeable, and besides, I never lose sleep over a missing comma or a run-on sentence. They are kind of my specialty.
Here in the Lab, we have been doing some minor house renovations, which have our home in disarray and have led to a regrettable lack of Christmas cheer on my part. Of course, it is lovely to have new windows and nicely refinished wood floors. But half of our furniture and most of my clothes are still in the garage. The fact that the furnishings have refused to reassemble and march themselves back into place has led me to believe that now is not the time to go carelessly spreading Christmas decorations about the house.
So after waiting unsuccessfully for the furniture to magically reappear, it has begrudgingly come to my attention that we humans (the dogs and cats are entirely useless regarding any heavy lifting jobs) will have to be responsible for putting the house back in order. But you know when humans get involved, and by humans, I mean me. Things get messy. For instance, now that the floors and windows are so beautiful, our furniture, walls, and baseboard look horribly shabby. So there is cleaning, analyzing, painting, contemplating, procrastinating, fretting, scrubbing, scraping, and finally shopping to be done.
There are purchases to overthink. Questions must be answered and worried over and re-answered.
- Will it match our existing furniture? (History would suggest no.)
- Will it fit where we want to put it? (Again unlikely.)
- How long will it take the dogs and cats to destroy it? (I do try to stick to a strict 5-day minimum.)
But seriously, I spend considerable time pondering, if I really like whatever It is that we are thinking of purchasing.
It is a verifiable fact that a (insert a piece of furniture here) always looks fantastic in the store, and in my home, it will morph to the shabbiest version of itself. Ok, yes, that is where the cats and dogs come in. I don’t want to give you the impression that they are good-for-nothing. And I must be sure to give credit where credit is due.
If the pets have one thing they excel at, it’s breaking in the furniture. It’s like their superpower.
I like to think they give everything a cozy, lived-in feeling. You know, like a soft winter sweater or a favorite pair of jeans. Of course, sometimes, this takes a particularly strong pair of rose-colored glasses and a mild case of anosmia. It’s ok if you need to google that word; after all, I had to. But I digress.
Where was I? Oh yes. I swear the color changes on purpose to clash with every bit of our existing decor. Whatever It is, it swells to take up twice as much space as I imagined and makes the room look cramped and tiny. Yes, I am thinking of you bloated-and-spiteful-I-thought-you-were-blue-but-you’re-not couch! You can read all about that mishap here. But the short version is I smothered it in red paint, and believe it or not; we have made amends.
So we are shopping (and by we I mean me, myself, I and John) for some new chairs. We have traversed the store more than once and have circled back to a very particular set of chairs and John says “This is exactly what you said you wanted so we are going to buy these. Right?”
I can tell I have about worn him out, but I am like, “I need to think about it some more.” And then there is some eye-rolling, and one of us has to leave the room, which is difficult when you are shopping for furniture because those showrooms are huge.
But we are finally able to make some purchases. So there is new furniture to assemble and old furniture to dispose of; the latter is accompanied by intense feelings of guilt over my wastefulness, for which I might need professional help.
Me 1 – “That desk was perfectly functional.”
Me 2 – “But it was beaten up and ugly.”
Me 1 – “You should have fixed it. I mean upcycling! Isn’t that what you do?”
Me 2 – “Yes, but I can’t fix everything.”
Me 1 – “You are just being lazy.”
Me 2 – “You are mean.”
Me 1 – “I need some wine!”
Me 2 – “Me Too!”
It’s nice that we can agree sometimes. Don’t you think?
So the new furniture is assembled and thus begins the hours of negotiating, rearranging, and arguing.
“This should go there.”
“No, that should go there.”
“That looks stupid.” etc.
And that is all before I even let John get involved.
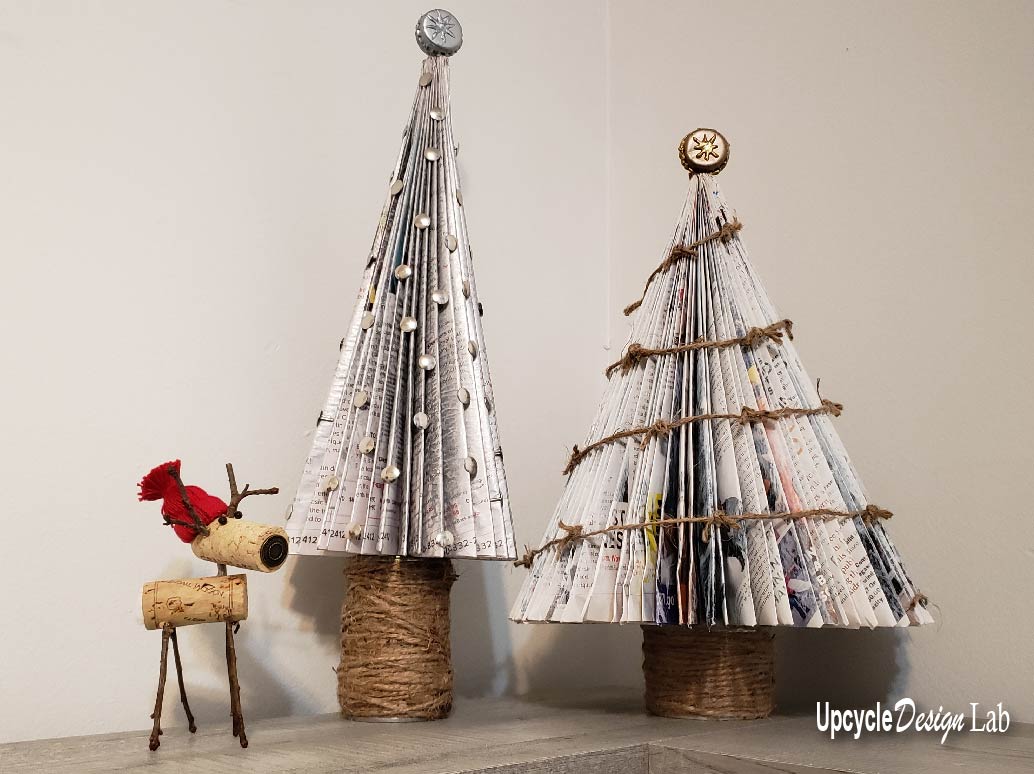
It has been months since I have seen our dining room table, and we have miles to go before we complete this whole transition. So I have decided to be at peace with our house in disarray, and while it seems a little reckless to go about sprinkling Christmas decorations everywhere, I have concluded that it is a little too grinchy to have no decorations at all. So in my last post, I made some cute reindeer from corks and twigs and placed them on the mantel for the cats to play with.
Grammarly thinks you might object to my using with at the end of that last sentence, but I assume if this is the case I already lost you with that Peter Pan Paragraph.
Anyway, the purpose of the cork and twig reindeer was not to be cat toys; it was just a serendipitous side effect. But the reindeer looked forlorn and awkward up on the mantel by themselves, so I hauled out a few other decorations, and still, it looked unfinished and weird which lead to me making these trees from some junk mail catalogs.
Hallelujah! I can hear you thinking. Yes, I have finally gotten to the project part of this post. But spoiler alert, the mantel still looks unfinished. So I guess I will keep throwing things at it. Perhaps it will be completed by Christmas. Or I will just stop caring and find something else to obsess over.
Materials
- Junk Mail Catalog
- Small Tin Can
- Safety Can Opener
- Hot Glue
- E6000 Glue
- Twine
- Sliver Acrylic Craft Paint
- Two Bottle Caps
- Tooth Pick
- Sliver Plaid Dimentional Paint
- Silver Thumbtacks
Advertising Disclosure: Upcycle Design Lab may be compensated in exchange for featured placement of certain sponsored products and services or your clicking on links posted on this website.
Step 1 – Fold Magzine
If you watch the video, you will note that this wasn’t quite as straightforward as I thought it would be, and you can decide for yourself whether or not the three-fold or the five-fold version is what you want. I recommend using a magazine catalog with around 100 pages or 50 folded pages.
Three Fold Tree – Yes I know there are four pictures here but the last fold is folded up and then tucked under. Hopefully, that makes sense.


For the Five-Fold Tree – Start by making the folds above and then add folds four and five. I know you are thinking that I don’t know how to count right now and I guess that one could argue that there really are more than five folds but there is a lot of folding, unfolding, and refolding for the last fold that I rolled into one. The video will explain the folds better if the pictures are too confusing.


This is my five-fold tree once all the folds are completed. I like how skinny and tall it is.

Step 2 – Open and Clean Can
You can use all kinds of things for the trunk of your tree. I have seen some beautiful tree trunks made from candle holders. You can also choose not to add a tree trunk. But I wanted to make my trees different heights, so I decided to use some tin cans. They are a good choice if you need to make a heavier base say if you have cats that might be prone to knocking the aforementioned trees off the mantel.
To make the tin can tree trunk, you will want to use a safety can opener. In addition to leaving no sharp edges on the can or the lid, this type of can opener also allows you to replace the top on the can. Next, clean the can, remove the label, add some rocks or other weighted items, and use the E6000 glue to reattach the lid to the can. If you are impatient like I am, you can also use a little bit of hot glue to make the connection solid more quickly.


Step 3 – Assemble Tree
Once the can is ready, use hot glue and E6000 glue to secure the folded magazine top to the tin can base. At this point, your tree is ready to decorate. First, I added some paint colors to mine with a dry brush technique. Then I wrapped the base with some brown twine.


Step 4 – Finishing
Here again, you can do your own thing. I choose to use some silver thumbtacks to decorate my tree. Then, I used two bottle caps, a toothpick, and dimensional paint to make the tree topper. You can see more details on my tree decoration in the attached video.


Thanks, bunches and oodles for stopping by.
Happy Upcycling,
Cindy


Love, I remember doing some similar as a child (I’m 72 yrs old).
Fun
Thanks for stopping by BB. Happy Holidays 😊
I absolutely loved your “Me 1 and 2 conversations. I laughed until my sides ached. Just to note…. I didn’t have to Google “anosmia”……I just asked Alexa 🤣
Loved the magazine Christmas trees.
Do have a Healthy, Happy, and Safe Holiday Season.
Hi Nj, Thanks for your comment. I am happy to know there are others with my kooky sense of humor. You have a wonderful holiday season as well.
I swear you’ve read my mind on everything in this post. The guilt! The self-talk! The indecision about large purchases! You’ve made it sound hilarious, though. Thanks for the tips on making the trees, and have a good holiday no matter how much or how little you’ve managed to decorate 😀
I am delighted to hear that you are amused and can relate. We humans do worry about silly things sometimes and I do enjoy poking a little fun at myself when I realize I am being a little rediculas. Happy Holidays.🙂
You are a delight, all your stories are so true to life and seem to scream a carbon copy of my life, Thank you for all your sharing and this recycled junk mail Christmas tree idea. Merry Christmas
Thank you for checking out my post. Merry Christmas to you as well. 🙂
Nice! Got my gears turning. Thanks! And, Congratulations on being published in Green Craft!
Thanks Charmaine, I hope you are having a warm and wonderful holiday season.
I think that you have tapped into my brain…especially the part about the eye rolling and having to leave one’s spouse for awhile in the furniture store 🙂 Not to mention the intense guilt about getting rid of the old furniture. Have you gone as far as to “fix” something to make it look appealing before donating it??? Hahaha I won’t name any names… Thank you for sharing!
Hi J,
Thanks for your comment. I haven’t fixed anything for donating yet. But never say never Right?