Wine Cork Crafts – Cork & Twig Reindeer Tutorial – Upcycling
You can make these cute little wine cork and twig reindeer just in time for the holidays. I saw them on Pinterest and I wanted to try and make my own. They make great gifts for family and friends, or you can keep them all for yourself to add some whimsy to your holiday decorations. I mean that’s what I am planning to do. The best part is they are easy to make and only require a few tools.
Advertising Disclosure: Upcycle Design Lab may be compensated in exchange for featured placement of certain sponsored products and services or your clicking on links posted on this website.
Step 1 – Tools and Supplies
For this project, you will need the following items.
- 2 wine corks
- Several small branches
- Tin Snips or Gardening Clippers
- E6000 Glue
- Center Punch
- Cordless Drill
- Straight Pins
- Small Button
- Q-Tip
- Yarn (optional)
- Hot Glue (optional)
- Small Piece of Cardboard
Step 2 – Cut Twigs
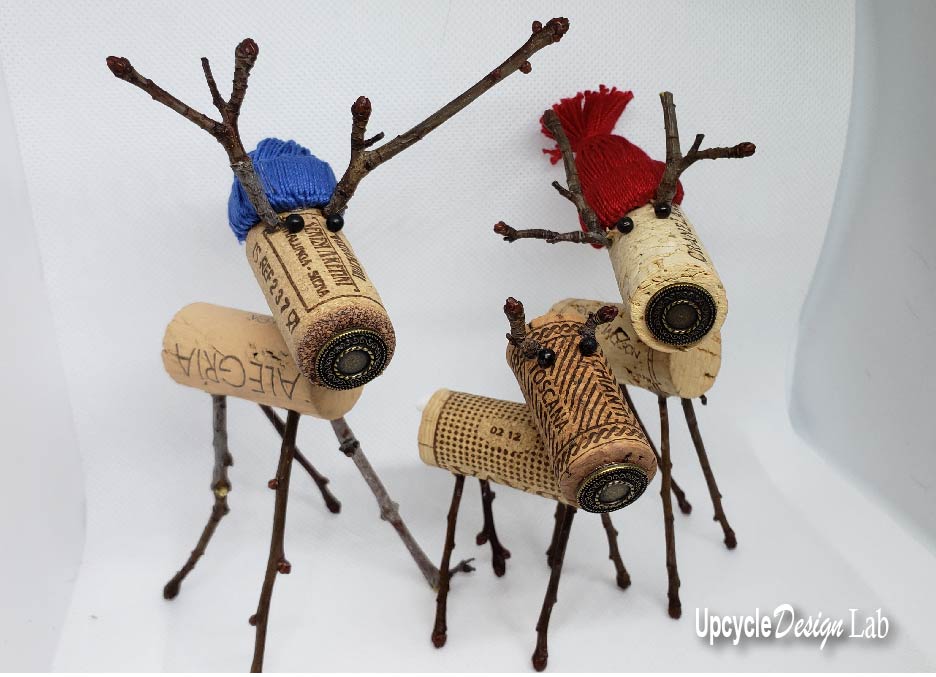
The twigs can be cut to your desired lengths. Pieces to be cut are four legs, two antlers, and one neckpiece. I cut all my neckpieces at about half an inch and the legs from 2 to 4 inches for the different-sized reindeer. The antlers are the fun part because you can make them and the size you want from big to small. To cut the branches I used my tin snips but any sturdy cutting tool will do.

Step 3 – Drill Holes in Corks
Once all the twig pieces are cut it is time to drill the holes in the cork. I used a center punch to mark the holes before making the holes with the cordless drill. For the placement of the holes, I used about one-half in from the edge of the cork and about one-half inch between the antlers and the front and back pairs of legs.


Step 4 – Assemble
Once you have drilled the holes, I recommend fitting all the pieces together before gluing them. Check to see if the reindeer will stand up and adjust the length of the legs if needed. If all the pieces fit well it is time to add the glue. I used E6000 glue which allowed for some adjusting of the fit as it takes a while to set and cure. I started with the head and then assembled the body and finished by attaching the two pieces at the neck.
Once the pieces are all glued together double-check to see that the reindeer will stand up.

Step 5 – Add Features and Details
You can wait until the glue is set or carefully add some cute details as soon as your reindeer is assembled. I used straight pins for the eyes, a Q-tip for the tail, a button for the nose, and crochet thread to make a hat.

I don’t know about you but I think these wine cork and twig reindeer are just too cute! You can find more details and instructions in the video tutorial. Thanks for checking out my project.
Happy Upcycling,
Cindy
Did you like this post? Check out more Upcycled Christmas Tutorials
My Christmas Decorations House Tour
Advertising Disclosure: Upcycle Design Lab may be compensated in exchange for featured placement of certain sponsored products and services or your clicking on links posted on this website.


Gah! These are too adorable!
Thanks Jenny_o 😊