Dragonfly Christmas Decorations – Upcycled Beer and Soda Cans
I hope I don’t sound too braggy, but this might be the cutest thing I have ever made from aluminum cans, and to be clear, I have made some pretty zany stuff using beer and soda cans.
I won’t yammer on about anything else as I sometimes do because this is already a lengthy post. So grab a cup of coffee and join me in my quirky mindscape, where soda cans become dragonflies.
Step 1 – Gather Supplies
For each dragonfly, you will need the following
- Four empty aluminum cans
- Two small round black beads
- 8.5 Feet of 18 or 20-gauge copper wire
- **Bead templates
- **Wing template
**The free templates can be found at the bottom of this post
Additional tools and supplies
- Scissors
- Iron
- Scotch tape
- Mod Podge
- Alcohol Ink
- Metal tape
- Green Creativity Bead Roller
- Toothpicks
- Small paintbrush
- Round-tipped jewelry pliers
- Wooden skewer
- E6000 glue
- Small piece of craft foam or felt
- Embossing tool
Note – This is a complex and lengthy project. I recommend watching the video tutorial for clarity on some of the steps.
Step 2 – Remove Print
This step is optional, but I like to have shiny sliver wings on my dragonflies.
Note: You only need one can with the print removed.
There are a few different ways to remove the print. The first method is to scrub off the image with a brilliant pad or steel wool. Unfortunately, this method takes quite a bit of time and needs to be done while the can is full or after the piece of aluminum has been flattened.
I have not tried the second method, but it appears to work much faster. It requires a pressure cooker and, I believe, fingernail polish remover. You can search for video tutorials online if you want more information.
The third method is my favorite and the easiest of all. But it does require a specific can; if you look around while shopping, you can find cans with plastic wraps instead of the actual print. The wrap peels off to reveal a shiny silver can.

Step 3 – Clean and Flatten
You will need to remove the tops and bottoms from all the cans and then flatten the side. When you complete this step, you should have three aluminum sheets with print and one without print.

Watch this video to see how I flatten cans for crafting.
Step 4 – Cut
Check the bottom of this post for the free templates. There are three template templates for the beads and one for the wings. In addition, you will find two versions of the templates a PDF if you will be cutting by hand and an SVG for cutting on your Cricut cutting machine.
Note – Be sure to cut the wings from the can with no print. If you are cutting by hand, do not cut the wings yet. If cutting with a machine, do not weed the wings in this step.
Watch this video to learn more about cutting aluminum sheets on a Cricut machine.
Step 5 – Roll Beads
You will need a bead roller for this step. I recommend the Green Creativity Bead Roller. You should be able to find one for less than 15 dollars.
There are three sections for each bead. First, I used a small piece of metal tape to attach the pieces. Each piece has a wide and narrower end, so they fit together to make one long tapered piece. Next, I added a bit of metal tape to the tip of the bead.

Once the pieces were assembled, I used the wooden skewer to start the roll and the bead roller to complete the bead. The piece of tape at the tip holds the bead together.

Note – Each dragonfly uses six beads, and the templates make seven beads, so there will be one extra bead.
Step 6 – Color and Seal Beads
Once you have assembled six beads, you can add the finish.
This is a three-step process. First, before adding color, the beads should be sealed to secure the metal tape and keep the beads from coming apart during the coloring process. I used a toothpick and mod podge for this step.
Once the mod podge was dry, I applied the color by placing the beads in a small container, dropping in some alcohol ink, and gently shaking the container to cover the beads.

After the ink was dry, I added a second coat of mod podge to seal the ink.
Step 7 – Assemble
If you want to recycle this project completely, you can strip salvaged copper wire as I did. Or you can purchase wire as a more sane person would do. 🙂
To start, cut the copper wire into the following lengths to assemble the dragonfly.
- One piece – 30 inches
- Two pieces – 15 inches
- Three pieces – 8.5 inches
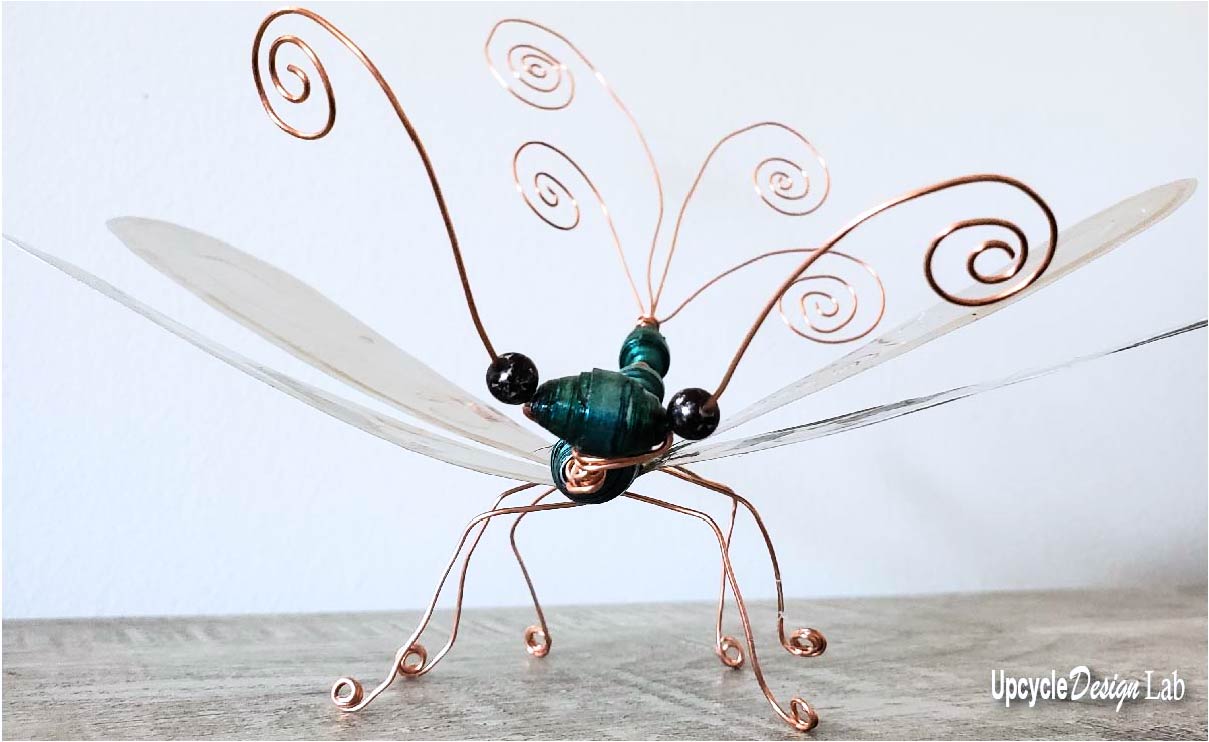
First, coil one end of each 15-inch piece. Next, add one small black bead to each wire and string the wires through one metal bead in opposite directions. Then bend the antenna to the desired length. I made mine approximately 2 inches long.

To finish the head portion, I inserted the 30-inch piece of wire through the metal bead and twisted all four wires to make the neck and secure the bead in place.
To make the body, I strung each bead through all four wires and then wrapped the two longer wires are the shorter wires to make a spacer between the beads.

All four remaining beads are added in this fashion, and the ends of the wires are curled to make the tail.

To make the legs, I wrapped one 8-inch piece of wire at the top of the second bead in the dragonfly’s body and two 8-inch pieces at the bottom of the same bead. Then I shaped the wire to finish the legs and feet.

Step 8 – Emboss Wings (cut)
*Hand-cutting instructions
If you are hand-cutting the wings, print the pdf file and tape it to the aluminum sheet. Next, use a soft surface (craft foam or felt) and the template to emboss the design on the wings and scissors to cut out the shape.
*Machine-cutting instructions

Cut the design on your Cricut machine. Do not weed the design. Print and cut out the pdf template and tape it to the aluminum sheet. Next, use a soft surface (craft foam or felt) to emboss the wing design following the template. Remove the paper template and weed the design.
Both methods of cutting use the following steps to complete the embossing. Continue working on the soft surface and the same side of the wings and emboss 1/8 inch from the edge around the wings.
To finish the embossing, turn the wings over and work on a hard surface to reinforce the embossed design.

Step 9 – Finish
I used E6000 glue to attach the wings and secure the eyes to complete the dragonfly. Once the glue had hardened, I shaped the wire to finish the dragonfly.

Happy Upcycling,
Cindy

Advertising Disclosure: Upcycle Design Lab may be compensated in exchange for featured placement of certain sponsored products and services, or your clicking on links posted on this website.


Hi Cindy,
sorry for the troubles you are having with YouTube….. if there is anything I can send/email to them to help get your channel back on would be pleased to do it…. so we all (your followers) can get back to upcycling our cans. I’ve been collecting the pop tops for the necklace video, which I believed I saved, (or some other projects)
good luck, Barbara H.
Hi Barbara,
Thanks for your comment and support. I am cautiously optimistic and hope to have my channel reinstated soon.
Best,
Cindy
HI Cindy,
So sorry this happened to you!!! I have spent the last hour looking for your videos and finally found you here. I thought maybe you decided to quit Youtube and start something else.
You really are the guru for aluminum can art. You are so talented and I’m so proud of all your accomplishments!!
I do hope your account gets straightened out.
Good luck!
Hugs!
Patty
Hi Patty,
Thanks so much for your comment. All the encouragement means so much to me particularly in those moments when I feel like crying. 🙂 I am continuing to work on recovering my channel, but it is a confusing process, and it takes time. Fingers Crossed.
Best,
Cindy
I would really like to watch the YouTube video again but it seems to be terminated. Is there another way to watch it? I saved it but cannot for the life of me find it.
Hi Debra,
I am sorry for the inconvenience but my YouTube channel was hacked a few days ago so none of my videos are available. I don’t have access to my youtube account and my channel is not live. I am hopeful that I will be able to regain control of my account and that my channel is still intact but I have no idea how long it will take or how successful it will be.
Best,
Cindy