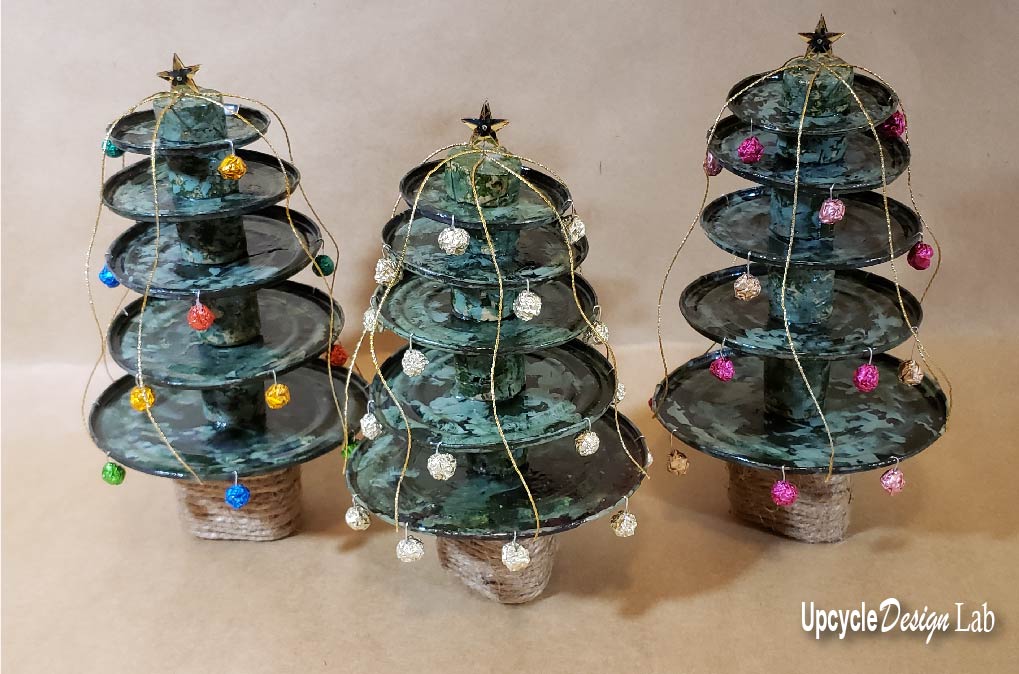
Mini Tin Can Christmas Tree – Upcycled Crafts
Are you looking for a fun and simple Christmas craft to make from recycled materials? Here is a quick tutorial on how to make a cute mini Christmas Tree decoration using items from your recycling bin.

Step 1 – Gather Tin Cans
For this project, you will need several different-sized tin cans. I used cans in the following sizes, 46oz, 24oz, 15oz, 10oz, and 6oz.

Advertising Disclosure: Upcycle Design Lab may be compensated in exchange for featured placement of certain sponsored products and services or your clicking on links posted on this website.
Step 2 – Use Safety Can Opener
Before you consume the canned goods, be sure you have a safety can opener. Safety can or clean edge can openers allow you to open your cans without leaving the sharp edges left by a regular can opener. These unique openers also leave a short curved lip on the can lid.


Step 3 – Rust Tin Can Lids
This step is optional, but I like the finish better once the shiny silver has been removed. You can find how I quickly rust tin cans and prepare them for projects in the video below.
Step 4 – Paint Tin Can Lids
I used my lazy painting method to cover both sides and the edges of the lids. To use this method I started with the darker green color, I used a paintbrush to dab on some color in splotches. As I mentioned, I like the rusted finish underneath, so I don’t cover the entire piece with paint. Next, the light green color is layered on top using the same technique.

Step 5 – Cut and Paint Wine Corks
For the tree trunk, I cut five wine corks in a graded stair-step pattern and painted them the same way as the tin can lids.

Step 6 – Wrap Wine Corks
Then I used three more full wine corks glued together in a triangle shape and wrapped them in some twine to make the tree’s base.

Step 7 – Assemble Pieces
Starting with the largest can lid, I used a combination of E6000 glue and hot glue to attach all the pieces. I like to use these two types of glue together when I need a quick hold from the hot glue and a more permanent heat-resistant hold from the E6000 glue. Then I assembled the pieces from largest to smallest alternating between the cans and the cork pieces.


Step 8 – Seal the Finish
Once the tree pieces were assembled, I used some glossy mod podge to seal the mini Christmas tree decoration.

Step 9 – Make Tree Ornaments
To make the mini tree ornaments I used a gold foil candy bar wrapper. I started by cutting the wrapper into small squares and then shaped each square into small, loosely crumpled balls. I have also used colored foil gum wrappers for this step. Five gums peppermint flavor is my favorite, and it comes wrapped in pretty blue foil. 🙂

The second part of making the Christmas tree decorations is to glue a small piece of wire inside each ball and finish crushing the foil into a small solid sphere.

The final step for the ornaments is to trim off the excess wire and bend a slight curve into the end. The hook allows the ornament to hang on the lip of the tin can lids.

Step 9 – Decorate
To complete my mini Christmas tree Decoration I used some gold cord, my handmade foil Christmas ornaments, and a tree topper made from gold star sequins to decorate my tree. Once the decorations were in place, I secured them with a little bit of the mod podge to keep them on the tree.

If you enjoyed this post you might also like…
Thanks for checking out my post.
Happy Upcycling,
Cindy
Advertising Disclosure: Upcycle Design Lab may be compensated in exchange for featured placement of certain sponsored products and services or your clicking on links posted on this website.


